Drawstring Quilt

My family and I recently visited my brother and his family in Hawaii. My brother and his wife were super-hosts and planned such a great visit for us. I wanted to take a gift and decided on a quilt for my two sweet nephews.  Over the past year or so, I collected i-spy charms – 5-inch squares of novelty fabrics. Most were found and purchased on Instagram via the #thegreatfabricdestash hashtag.  I may have purchased a few on etsy.  The remainder of the fabrics were in my stash or were picked up as remnants here and there. There are at least eight Heather Ross in here. Her little animals and images are perfect for i-spy.

drawstring quilt
Drawstring Quilt : Rainbow i-spy style!

Rather than make a standard quilt, I used the Drawstring Quilt pattern by Tales of Cloth. This is a great pattern with a clever binding method that adds a drawstring casing around the perimeter.  The quilt is perfect to use a playmat or a picnic blanket that can be cinched up and taken along as a bag, toys and all. The instructions were detailed, clear and easy to follow. The included pictures were very helpful, especially for the binding steps.   The pattern makes a hexagon quilt using strips, but was easily tweaked to use charm squares.  My layout kept growing and growing and eventually became a fairly large octagon.

i-spy drawstring quilt
For the drawstrings and backing, I used Essex yarn dyed linen blend by Robert Kaufman. I love the durability and stain-hiding that the Essex adds, especially since this quilt will likely be used outside.
drawstring quilt
 
The binding is a new favorite of mine – tiny black and white stripes set on the bias. It’s from the First Crush collection by Sweetwater for Moda fabrics.  I’m glad a have another yard for future projects.
i-spy quilt

Choosing the fabrics (and raiding my stash for more), tweaking the color gradient, and then endlessly swapping and moving squares around was so fun.  I can’t count how many times the layout changed.  My girls and I loved playing i-spy along the way.  I can now easily point out every marble, elephant, piece of sushi, and sunglass-wearing pig on this quilt!! The good news is, I still have plenty of i-spy charms left to play again and make more quilts!

Messenger Bag from Little Things to Sew

At the same time that I was waffling between a few different bag patterns for a new bag I had promised my oldest daughter, the Oliver and S blog featured a new school bag for S.  I was reminded of how much I loved the Messenger Bag pattern when I first bought the Little Things to Sew book by Liesl Gibson.

messenger bag pattern little things to sew

What a clever pattern this is, with all of the little design details and great curves.  I’ve made several bags, but never used bias tape to enclose all of the edges like this. Liesl’s patterns are so well written and flawless in finishing details.

The main fabric is Mochi Linen Dots by Moda which adds some durability to the outer bag.  Also, since the dots are a natural linen color (vs. white dots), any dirt is nicely hidden! The lining is a fun print I picked up at JoAnn a year or so ago. I love the punch of color the lining adds when the flap is opened! For ease, I used pre-packaged bias tape and love the contrast added by the navy.

messenger bag handmade

As I researched pattern notes and reviews of several bloggers (thank you!), I followed the lead of Bartacks and Single Track blog to slightly enlarge the pocket flaps and am glad I did.  I chose not to apply any closures on the pockets or the messenger flap.  So far, that has not been an issue.  My daughter uses a backpack for school, so this is her weekend bag.  It is perfect for our library trips and I am amazed at how many books she can fit in this bag!  Not having a closure on the messenger flap allows the bag to stay flexible.

I made this bag over several days, so the time and various steps were spaced out. I wish I blogged right after I finished in order to capture some more details and notes.  I followed the pattern as written, other than enlarging the flaps.  I did add some fusible fleece that was not called for in the pattern to add some heft and body to the bag.  The pattern offers both large and small options, and I made the large size for my 10-year old.  The smaller bag would be perfect for my 3-year old!

2015 Swaps

I dabbled in a few swaps in late 2014 and 2015.  It is an interesting process which allowed me to try some new things and actually finish some projects given the deadline and hopeful partner waiting on the other end of the swap.

My first swap was the #merrymodernswap.  After considering a scrappy Christmas tree mini-quilt, I landed on this tree table runner that pairs natural linen with some colorful prints.  A few years ago I made a similar pillow and my swap partner had a similar project on her inspiration collage.  I won’t lie, I felt a little pressure when my partner was revealed as a super-talented pro in the swap game. She nails every swap – project, extra goodies and packaging.  I love how this turned out.  I considered binding but thought turning out would maintain the simplicity and modern feel of the project.  I’m glad I went that direction.  An edge of binding, even in the matching linen, would have distracted from the simplicity of the trees.  And I do love that sole red tree 🙂


Handmade Christmas table runner sewn in linen


For a local meetup, I participated in a zipper pouch swap.  Ellen mentioned loving the new (at that time) Doe collection from Carolyn Friedlander.  I purchased a charm pack and paired some of the prints with other fabrics from Carolyn that I had on hand – gray crosshatch for the exterior and a white/orange Botanics leaf  print for the lining. I kept things simple and let the fabrics shine.  To add some interest, I quilted random straight lines in coordinating thread colors. Those colorful lines are my favorite part of the pouch.


Carolyn Friedlander Doe fabric


My favorite and most colorful project of 2015 was a Raspberry Kiss Mini made for the #lovewinsminiswap which celebrated the Supreme Court’s wonderful decision for marriage equality. How gorgeous is this bundle of Karen Lewis Textiles screenprints?  The colors are a highly saturated take on the rainbow and worked well with assorted low-volume gray and white prints for the background and sashing.  The rainbow kiss blocks from Wooden Spool Quilts  are so fun and easy to make.  I was challenged a little on layout once my blocks were made, and after at least 20 trial layouts, I decided on the 3 x 3 layout with sashing.  I really love this project not just for the beauty and meaning behind the quilt, but also the challenges it offered me in color and layout and my first hand binding.


Raspberry kiss rainbow mini quilt

First Quilt – Strip Tango for my Niece

I made my first quilt!  It was a gift for my youngest sister who is expecting a baby girl.  I don’t know if I would advise making your first quilt as a gift!!  You might want to practice a little, first. Nevertheless… I had fun with this process and learned so much.  Choosing the fabrics and piecing the top was so fun and actually went fairly fast, in comparison to the rest of the process – sandwiching, machine quilting, binding. 
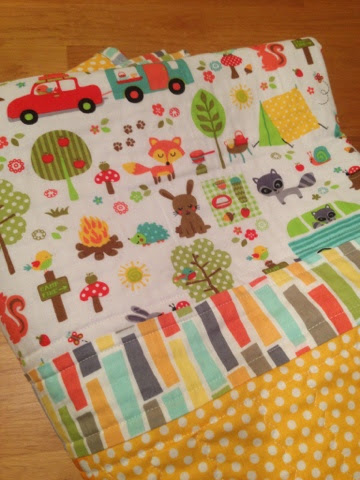
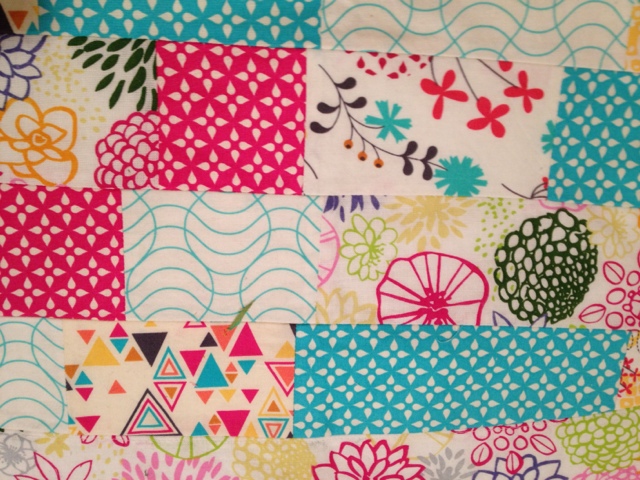
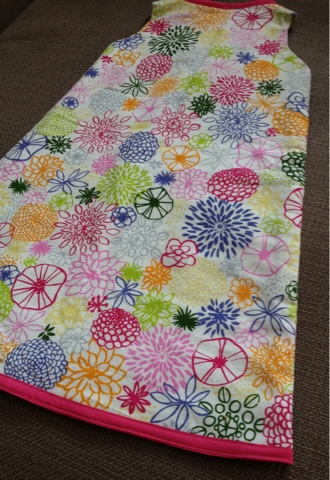
 Initially, I planned to use Heather Ross’ Briar Rose collection for her quilt, but once I saw the crib bedding, I changed my mind.  I decided to mirror my niece’s crib bedding which features little foxes and orange and aqua tones.  First I found the cute, cute, cute woodland animal fabric used in the center panel  It is “Camp Out” in white from Michael Miller’s Sorbet Collection. From there I chose the other fabrics, also Michael Miller except for the white print (which is Washi). I love the fresh colors and combination of patterns. I purchased the fabrics from fabric.com and really liked using the design wall feature to see the fabrics together.  The backing, which is not pictured, is “Widescreen”crosshatch from Carolyn Friedlander in gray on white.  
Strip Tango quilt
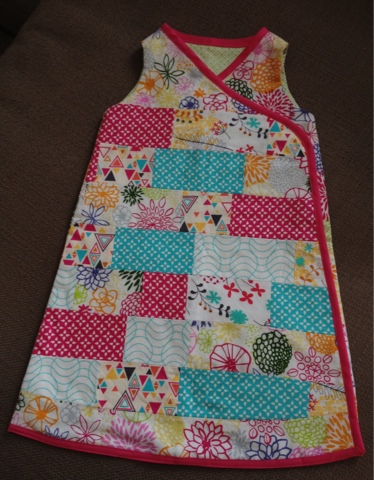
The quilt pattern, which I found via Pinterest by searching baby quilt is Strip Tango from My Quilt Infatuation.  It uses large strips (4.58 x 20.5 inches) which are quick to piece and allow for a little play with the different fabrics. The woodland fabric became a feature block framed by one of the other prints. I definitely recommend this pattern for a first quilt, or when you need to make a quick quilt to gift. 
string tango quilt

So, true confession, I started this first quilt with a definite deadline (baby shower!) without really knowing what I was doing.  Piecing the top was so fun and went very fast….and then the project stalled. I had read about the sandwiching and qulting process, but had never actually done it.  I started reading blog posts and pulling all the dusty quilting books in my sewing room, to prepare myself to jump in!  I decided to take some steps to simplify the process.  I didn’t try pin basting and went for spray basting, which was fairly easy after I watched some youtube videos for tips.  I also did not piece the back, so that also simplified things.

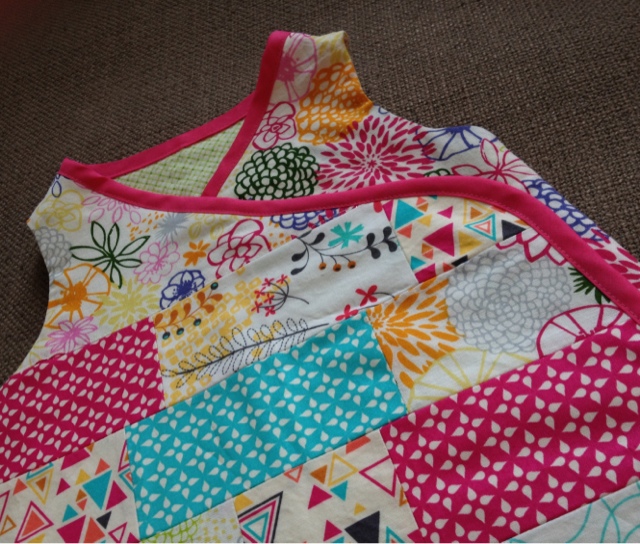
Next, I needed to machine quilt this beautiful basted sandwich.  I should mention that this baby quilt is really not “baby” sized, at 48″x60″ and I really didn’t take into account wrestling this through my small-throathed machine. But, I learned from the experience.  Again, I watched some youtube videos that were incredibly helpful and will add the links when i find them. I quillted in randomly spaced vertical lines with a very loose multi-step zip zag stich.  I got inspiration for the quilting style from a post on Vanilla Joy.  You can sort of see my quilting lines in the blurry picture above. (another lesson learned, take plenty of pictures before you race off to gift the quilt!).  For the center block, I stitched around the outside borders. It was sort of a pain to quilt around this block and I wasn’t quite sure what to do when I ended a row of stitching at the center block (ie bury the threads, lock stitch, etc??), so things got a little messy. Hopefully my niece won’t mind ;-).

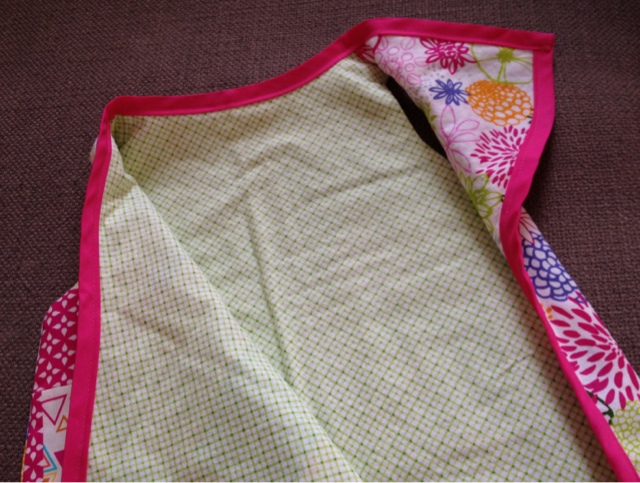
For the binding, I kept the process simple and machine stitched.  I think it looks nice. Perhaps, I’ll hand stitch the binding.  I have one last step on this quilt and that is adding a label. After sweet baby girl is born, I want to make a label with her name and vital stats!

Supertote in Anna Maria’s Ghostwing

The Supertote by Noodlehead is as super as you’ve heard!!  This is my first time using one of her patterns, and it definitely lived up to the reputation – quite thorough with nice details that make the bag special and functional.  I actually made this bag as part of a class at a local shop – SEWN Studio.  It was nice to have dedicated sewing time, especially for an intricate project like this.  I learned some great tips along the way from our instructor and tried some new skills such as making piping and installing a recessed zipper.  

Supertote


My main fabric is the gorgeous Ghost Wing print by Anna Maria Horner.  It is a linen-cotton blend and the colors are just amazing.  For the gusset, I used a dark denim from my stash. I have seen some nice versions of the Supertote using Ghost Wing and a natural linen, which i contemplated.  In the end i went with the darker denim so the bag could be a little less fussy (read:  not as prone to picking up dirt).  The dotty lining is from Kaffe Fassett and I found it locally at Silk Road Textiles.

I don’t really enjoy making straps and wanted something sturdy, so I picked up some jute webbing.  Because I was only a day or two away from the scheduled class, I found this at Hancock in the upholstery section.  Next time I will shop online where it is much, much less expensive.  


The denim gusset was actually a redo.  Initially, I used a light brown linen-blend and just didn’t love it.  I doubted it all along the way, and only decided to start over once the gusset was fully attached.  Of course…  I should have listened to my gut sooner.  I used one of the aforementioned tips learned during my class to rip the seams  – my husband’s hair clippers ripped the seam right out.  Have you tried this?  Amazing!  Fast! And he didn’t know the difference after I blew away the lint 😉

I followed the pattern closely, but added just a couple of variations.  I divided the inner pockets – one into two sections (large enough to fit diapers and wipes) and one into three sections (great for smaller items).  I added an additional hidden pocket to the large outside pocket.  It’s a small slip pocket near the top to hold my phone.  I’m so glad I did. This bag is so large, I would never find my phone!  I may add a clip for my keys for the same reason. 

Initially, due to its size, I didn’t anticipate carrying this bag as my main purse/tote, but I have.  It is large, yes, but not bulky at all.  And it holds everything I need – regular purse stuff, plus my water bottle, toddler supplies, book, mail, etc.  A magazine slips perfectly in the outside pocket.  

I’ve carried this bag for over a month and have been happy.  I will add a key clip as mentioned.  One thing I will pay closer attention to next time is slightly increasing the size of the lining (top to bottom dimension).  I seemed to have sewn it slightly smaller than the outer bag.  When the bag is loaded up, the top of the bag sort of pulls inward as you can hopefully see in the photo below.   Adding a little length should solve that issue.


Next up, I plan to make a slightly downsized Supertote with a cross-body strap for my 9-year old.  

Prefontaine Shorts for my girls

This summer, I made two pairs of Prefontaine Shorts by Made by Moxie. I bought this pattern as part of the Perfect Pattern Parcel.   This is such an easy pattern to sew up, with big results.  Love these shorts.  The shorts are bound with strips of t-shirts. Genius!  Cutting and applying the binding was so easy.  I immediately starting thinking of other applications.

Girls Prefontaine shorts by Made by Moxie

 This floral pair is one of the Briar Rose prints from Heather Ross.  This is the smallest size and fit my almost 2-yr old perfectly.  The teal pair are for my oldest daughter.  The fabric is upcycled from an old summer dress of mine and is the softest cotton.  Both pairs received alot of wear this summer.

And the pockets are a hit with the toddler set!

Pea Pod Baby Carrier

How cute is this Pea Pod Baby Carrier that I made last fall?  It is a free pattern by Sascha Romeo featured on sewmamasew in 2010. The Pea Pod is designed to carry an older baby on the hip. This was easy to sew and a fast make – my favorite kind!
 20131113-092126.jpg
The fabrics are both home dec weight from IKEA. I’ve had that grey print since I first saw it popping up in bags and other makes on the interwebs a year or so ago. I love the burst of white and like the corner placement I chose on the carrier.
I didn’t have fusible fleece on hand so I just used some warm and natural batting and added the random quilting lines to secure it to the orange lining piece. The buckles were ordered online from Strapworks
 20131113-092139.jpg
This orange and grey combination makes me happy :-) . I haven’t used the colors together before but after i made this realized I have several things pinned with this combination. And I recall watching a Tennessee Vols football game recently and admiring their orange and grey uniforms. It’s what you notice when you watch football, isn’t it? Use of color and pattern and……
 My baby is 14 months in the photo. The fit is nice for her and comfortable for me.

20131113-092151.jpg
20131113-093526.jpg

Pea Pod Baby Carrier

How cute is this Pea Pod Baby Carrier? It is a free pattern by Sascha Romeo featured on sewmamasew in 2010. The Pea Pod is designed to carry an older baby on the hip. This was easy to sew and a fast make – my favorite kind!


20131113-092126.jpg

The fabrics are both home dec weight from IKEA. I’ve had that grey print since I first saw it popping up in bags and other makes on the interwebs a year or so ago. I love the burst of white and am glad of the corner placement I chose on the carrier.

I didn’t have fusible fleece on hand so I just used some warm and natural batting and added the random quilting lines to secure it to the orange lining piece. The buckles were ordered online from Strapworks


20131113-092139.jpg

This orange and grey combination makes me happy :-) . I haven’t used the colors together before but after i made this realized I have several things pinned with this combination. And I recall watching a Tennessee Vols football game recently and admiring their orange and grey uniforms. It’s what you notice when you watch football, isn’t it? Use of color and pattern and……


My baby is 14 months in the photo. The fit is nice for her and comfortable for me.

20131113-092151.jpg

20131113-093526.jpg

Embellished for Baby

Last summer I picked up three relatively plain baby shirts from Old Navy. I liked the simplicity of the patterns and muted colors, and I knew they could easily be embellished. As with my last few projects, these shirts were quick and allowed me to play with colors, patterns and shapes. The top stitching got a little tedious, though!
When I started sewing again a few years ago, I went a little crazy buying fabrics, especially as I discovered all the amazing modern designers. Doesn’t everyone want to buy everything in sight when they first get started? So I have a fairly decent stash of some quilting cottons from a couple of years back, not much yardage but enough to play with.

Little did I know that each designer offers new collections every year and that some fabrics become so coveted they require frequent google, etsy and ebay searches and bring premium prices! I occasionally search for Anna Maria’s Small Gathering. So sad that I didn’t scoop any up although I loved it so.

The fabrics used here are some favorites- from Amy Butler’s Love and and Erin McMorris’ Park Slope
The cute little green pants are the Quick Change Trouser from Anna Maria Horner’s Handmade Beginnings in my favorite Park Slope print lined with a flannel. These seem to run a tad big. I cut a 3-6 month size and they fit my seven month old. They will be nice during some of the chillier spring days ahead. I will make more of these for sure in larger sizes.

AMH Patchwork Sleeping Sack

For Christmas I made the sleepsack Anna Maria Horner’s Handmade Beginnings book.  The floral on the back side  is a Renate duvet from IKEA which I bought specifically for baby room projects. For the front patchwork, I combined the Renate with several prints from the Washi collection. I enjoyed making the patchwork and the process reminded that I really should try some modern quilting.

One variation from the book pattern was continuing the bias tape along the bottom. It creates a nice finish and encloses all the raw edges.  I also cut the patchwork strips in various lengths and with a 3″ width, rather than the 2″x2″ squares the pattern specifies. For the lining I used a green and white check cotton flannel from Joann.
Although Ella has outgrown the sleepsack already, I may just hang it in the nursery so I can still admire it. My older daughter remarked that the sleepsack actually looks like a dress, so I may refashion it at some point.